QR Reader Setup Guide
1. Download the QR Reader Software
2. Hardware Setup
Connect the QR Reader:
Plug the reader into your PC via Ethernet (for communication).
Connect the micro USB cable for power supply.
3. Launch the Software
Run the
.exefile that you downloaded. (attached below)
4. Device Detection
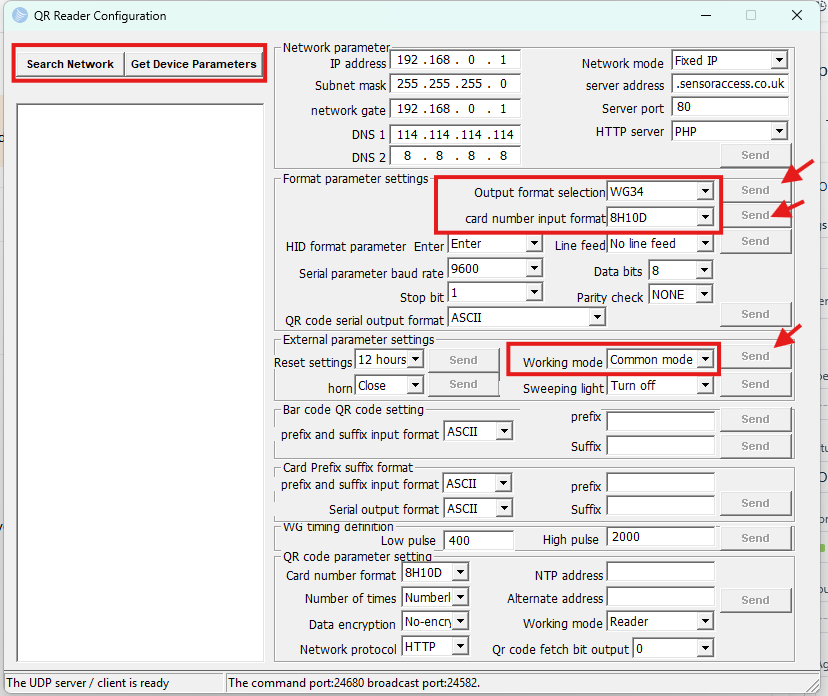
In the software interface, click “Search Device”.
You should see the device name appear below the button.
Select the device and click “Get current parameter” to retrieve its current settings
5. Troubleshooting Device Detection
If the device does not appear:
Disable antivirus software and firewall temporarily.
Ensure the reader is correctly connected via Ethernet and powered on.
Set the local network adapter to 192.168.1.X and search if still not detected try 192.168.0.X (Default device IP will be either 192.168.1.99 or 192.168.0.99)
6. Configure
Under “Output format”, choose desired output format e.g WG34
Card number input format should always be 8H10D
Working mode choose between Single or Common (see attached 'QR Reader Scanning Modes Guide' for more info on this)
Click “Send” to apply each change.
7. Confirm Settings
Click “Get current parameter” again to ensure the settings (especially the output format) were saved successfully.
Was this article helpful?
That’s Great!
Thank you for your feedback
Sorry! We couldn't be helpful
Thank you for your feedback
Feedback sent
We appreciate your effort and will try to fix the article