GuardPoint10 Generating Reports
Reporting in GuardPoint10 can be performed from different areas depending on the information required:
Management → Event History – for reports based on system events (access events, alarms, audits, etc.)
Management → Cardholders – for reports based on cardholder information
Management → Reader Permissions - for reports on access rights to a specific reader
Each screen allows the user to customise visible fields, apply filters, and save reusable Report Templates.
1. Generating Reports from Event History
The Event History screen allows users to create detailed reports based on system activity such as access events, alarms, and system audits.
Step 1 – Select Event Categories
At the top of the Event History screen, select the event categories to include in the report.
Examples include:
Access
Alarms
Audit
Communication
Technical
General
For demonstration purposes, selecting Access, Alarms, and Audit will display those event types in the report.

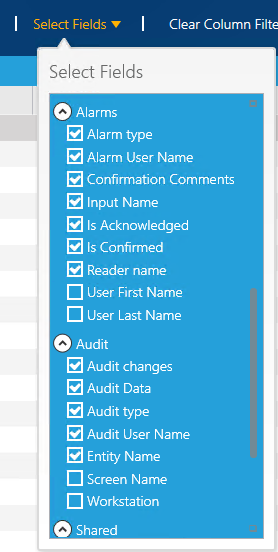
Step 2 – Select the Fields to Display
Click the Select Fields dropdown to choose which columns should appear in the report.
You can enable or disable fields depending on the reporting requirements.
Examples of available fields include:
Cardholder name
Company
Badge code
Access type
Reader name
Controller name
Denied reason
Alarm name
Input name
Event time
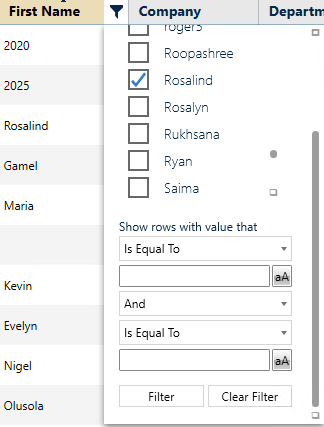
Step 3 – Apply Column Filters
Additional filtering can be applied directly to each column.
When hovering over a column header, a filter icon will appear.
Clicking this allows you to filter the data for that column.
Example: Filtering by Date
To filter events within a date range:
Open the filter on the Time column.
Set the filter conditions:
Is greater than (start date)
And
Is less than (end date)
You can also apply additional filters such as:
Controller name
Reader name
Badge code
Cardholder company

ℹ️ Multiple filters can be combined to refine the report and return only the relevant data.

Step 4 – Save a Report Template
Once the report layout and filters are configured:
Click Report Templates
Select Save As
This saves the current configuration as a reusable report template.
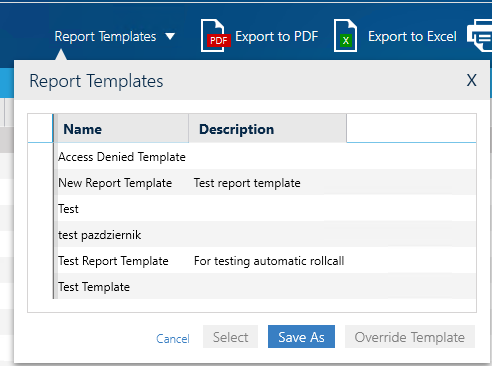
Enter a template name and click Save.
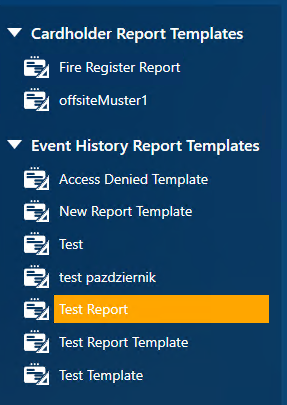
The template will now appear in the Report Templates window and can be reused at any time.

Step 5 – Display and Export the Report
From the Report Templates window:
Select the template
Click Display Report
This returns you to the Event History screen with the saved filters applied.
The report can then be:
Exported to Excel
Exported to PDF
Printed

2. Generating Reports from the Cardholders Screen
Reports can also be generated directly from the Cardholders screen.
This method is typically used when reporting on:
Cardholder information
Departments
Companies
Badge details
Access assignments
Step 1 – Select Fields
Click Select Fields to choose which cardholder attributes appear in the report.

Step 2 – Apply Filters
Filters can be applied to each column in the same way as in Event History.
Examples include filtering by:
Department
Company
Badge code
Cardholder status
Expiry date
Step 3 – Save Report Template
Once the report layout and filters are configured:
Click Report Templates
Select Save As
Name the template
Click Save
The report template can then be reused for future reporting.

3. Generating Reports from Reader Permissions
For GP10 v1.100.92 and above, reports can be generated directly from the Reader Permissions screen.

When first opening this view, the 'Defer Filter' button is enabled by default. You will therefore see an empty permissions table. You can either release the button to load all permissions (this may take a while if you have a lot of data). Alternatively you can apply column filters first and then release the Defer Filter button to load only the filtered permissions
The Reader Permissions screen shows a grid of authorised readers by cardholder. This grid allows you to know who has access rights to a specific reader and by what means (MAG, Personal AG or Temporary access).
Just like above, you can filter by specific fields and use a saved report template.
Key Tips
Report templates save both column selection and filter settings.
Multiple filters can be combined to produce highly specific reports.
Reports can be exported to Excel, PDF, or printed directly in GuardPoint10.1.160.4
Templates are available from the Report Templates window for both Event History and Cardholder reports.
Was this article helpful?
That’s Great!
Thank you for your feedback
Sorry! We couldn't be helpful
Thank you for your feedback
Feedback sent
We appreciate your effort and will try to fix the article