GuardPoint 10 MultiSplit Installation Guide
Introduction
From GuardPoint 10 version 1.80, MultiSplit makes the GuardPoint 10 system elastic by using distributed computing to split the workload between multiple 3rd party machines.
MultiSplit is best used for large or growing GuardPoint 10 systems. Imagine you have hundreds of controllers that generate a lot of events. These events must go through some processing, which unfortunately takes longer than to generate. For the processing to catch up with real-time, a slave machine can be designated to handle some of the processing.
Installation of MultiSplit
There are two parts to the MultiSplit installation:
- PART 1: Adds a Communication Service via the GuardPoint 10 GUI.
- PART 2: Adds and edits folders and files to support a Communication Service that was added via the GuardPoint 10 GUI.
PART 1
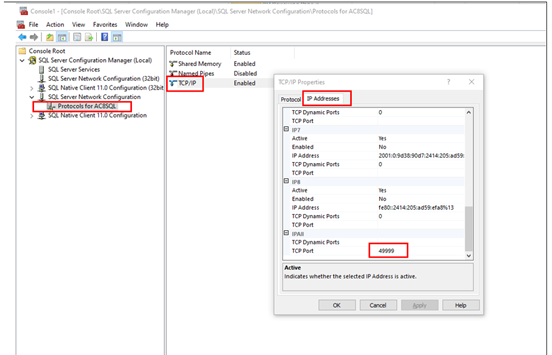
1. Open the Microsoft Management Console (MMC) on the machine where the SQL server is installed. Ensure the TCP Port is set to 49999.
- Open the MMC window via the Start button.
- From the menu, go to File> Add Remove Snap-in.
- Add the SQL Server Configuration Manager to the Selected Snap-in list.
- From the tree, select Protocolsfor AC8SQL.
- Double-click on the TCP/IP.
- Display the TCP Port value.
2. If the TCP Port value is not 49999, change it and restart the machine where SQL server is installed.
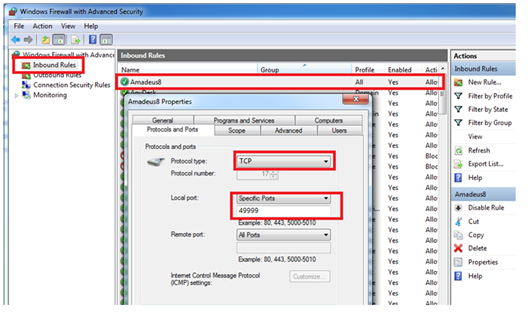
3. On the SQL server machine, create an exception in the Firewall to allow TCP Port 49999 (Inbound Rules).
4. On the GuardPoint 10 server machine, create an exception in the Firewall to allow UDP Port 12100 (Inbound Rules).
5. On the GuardPoint 10 Server machine, edit C:\ProgramData\ACS\NM\Split\SecComService.ini. Update both SQL_Connect and SQL_Connect_Main entries to contain the full SQL server name (e.g. Data Source=A8Server\AC8sql,49999).
6. Save and close the SecComService.ini file.
7. From any GuardPoint 10 installation, go to Options > General. Set Display MultiSplit to Yes and click Save.
8. Open the Infrastructure screen.
9. Click the Split Servers button in the action bar. The Split Servers window is displayed. The Split Servers window is where Communication Services are added to the system. The first row in the Split Servers window is the default Communication Service for each network in the infrastructure.
10. Click Add Split Server. A new row appears in the Split Servers window.
11. Fill in the new row with the following information: ID, Name, Description, UDP Listener, PC Name, TCP Address, Polling Path.
12. Click Save and note the Communication Service ID. This ID is used in PART 2.
PART 2
1. On the machine where GuardPoint10’s server is installed, open the File Explorer, and then go to C:\Program Files (x86)\GuardPoint10\NM.
2. Copy the SecComService folder and paste it into a folder on the 3rd party machine.
3. On the 3rd party machine, rename the SecComService folder to SecComService##, where ## is the ID number described in the PART 1 table.
4. Share the SecComService## folder so that any user from the GuardPoint10’s server can write to this folder.
5. Take note of the network path to the SecComService## folder (eg. \\NewPC\SecComService2).
6. On the same 3rd party machine, in the new SecComService## folder, open the SecComService.exe.Config file with a text editor.
7. Change the myNetGroupID value so it contains the ID number found in the parent SecComService## folder name (eg. Replace “value= “1”” with “value= “2””).
8. Change the applicationPath value so it contains the network path to the folder that has been shared previously (eg. Replace value= “C:\ProgramData\ACS\NM\Split” with value= “\\NewPC\SecComService2”).
9. Change the serviceCorIP value to match the IP address as the application server.
10. Save and close the .Config file.
11. In the same SecComService## folder, open the SecComService.ini file with a text editor.
12. In both SQL_Connect and SQL_Connect_Main entries, change the Data Source value so it contains the full SQL server name (eg. Replace “Data Source=.\AC8sql” with “Data Source=A8Server\AC8sql,49999”).
13. Save and close the .ini file.
14. On the same 3rd party machine, in the new SecComService##/MultiSplit folder, open the InstallSecComServiceSvc.bat file with a text editor.
15. Change the service name to AcsSecComService##, where ## is the same ID number found in the parent SecComServicer## folder name.
16. Save and close the .bat file.
17. In the SecComService##/MultiSplit folder, open Command Prompt as administrator from the File Explorer “File” menu, and then click Open command prompt as administrator.
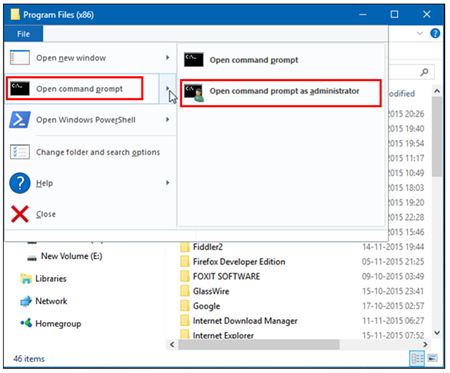
18. In the command prompt, type InstallSecComServiceSvc.bat to launch the .bat file in Administrator mode. This installs and starts the new service on the 3rd party machine.
19. On the 3rd party machine, create an exception in the Firewall to allow in Inbound Rules the UDP Port defined in the Split Servers window in PART 1.
20. In the Properties of the new service, open the Log On tab and add the relevant account credential details.
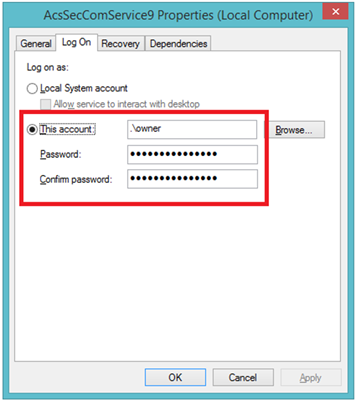
21. Press OK, and then restart the service.
22. On the GuardPoint10’s server, open the Properties popup of the AcsNMService service and repeat steps 20 and 21.
23. After all services are running, on GuardPoint10, click the Split Servers button in the action bar of the Infrastructure screen to open the Split Servers window.
24. Enter the Polling path with the network path to the folder that has been shared previously on the 3rd party machine (eg. \\NewPC\SecComService2).
25. Click Save in the Split Servers window.
26. Click the Test button in the relevant row (see the PART 1 table) to make sure the communication between the AcsNMService and the Split Service is successful. Then click the X at the top right of the Split Servers window.
27. In the GuardPoint10 network’s details, select the new Split Service from the Split Server drop-down list where the network will be hosted, and then click Save.
28. Restart the Split service previously assigned to the network to complete the communication switch to the new Split Service.
Was this article helpful?
That’s Great!
Thank you for your feedback
Sorry! We couldn't be helpful
Thank you for your feedback
Feedback sent
We appreciate your effort and will try to fix the article